01732 496 523
When installing either polyurethane (PU) or acrylic injection resin, to achieve a successful installation you will require:
- Injection packers
- A 1k or 2k pump (depending on the resin product being used) that is either pneumatic, electric or manual
- A drill
- Appropriate PPE
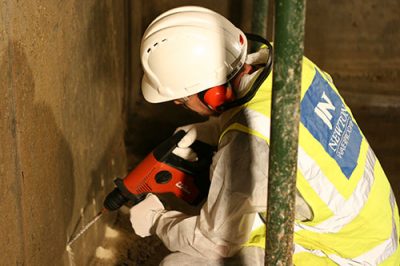
Step 1 – Preparing the Site
Before application can take place, correct preparation is vital. Firstly, the quality of the concrete needs to be checked, as injecting resins into the structure both requires and creates pressure. The type and dimensions of the injection packers also need to be determined in advance, which is dictated by the pump type, slab thickness and method of injection.
When preparing the substrate, any items that might obscure the crack need to be removed so that the area is clearly visible and the drilling patterns for the injection holes can be determined. If there is reinforcing steel present in the structure, try to locate it and plan the drill pattern in such a way that it minimises the likelihood of hitting it with the bit during drilling.
Waterproofing Design Support
Book A Design Consultation
Our team will design a bespoke waterproofing specification for your application, design stage, and performance requirements
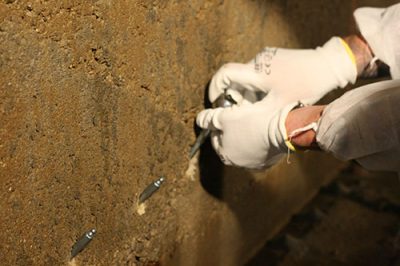
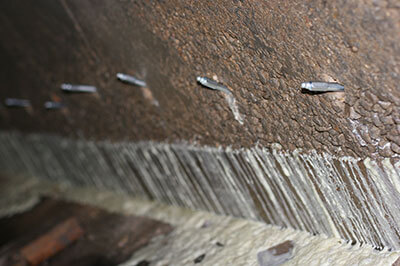
Step 2 – Inserting the Packers
The next step is to correctly insert the packers into the concrete. Holes must be drilled with an approximate angle of 45° or less to the surface, in the direction of the crack. The hole drilled needs to be deep enough that it cuts into the crack. The exception to this is when using the curtain injection method, in which case you should drill straight through the structure.
The distance required between the drilled holes will vary depending on the width of the crack. The wider the crack is, the further apart the drill holes will need to be. Once the holes are drilled, the packers should be installed so that the top of the rubber sleeve is below the concrete surface. Packers can be tightened with a wrench to achieve a tighter fit if necessary.
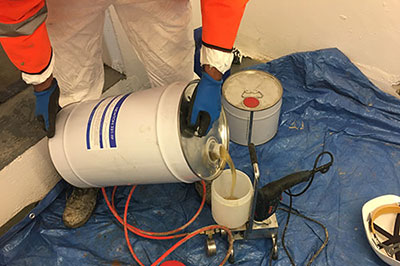
Step 3 – Prepare the Resin
To correctly prepare an acrylic injection resin, two mixtures will need to be created in separate containers. The first solution should contain the PC 509 Rubber Acryl resin component mixed with the catalyst and the additive. The second solution should contain the initiator component mixed with the strengthener.
The reaction time of the resin should be adjusted according to the ambient temperature, and if this needs to be changed then you can do so by adapting the quantity of the initiator component. However, the amount of catalyst used should always be the same, as any change would result in compromising the structure and quality of the resin.
To correctly prepare a polyurethane resin, mix the resin component with the catalyst, or mix the A component with the B component. Again, the reaction time will need to be adjusted according to the ambient temperature and this can be achieved by adapting the quantity of the catalyst.
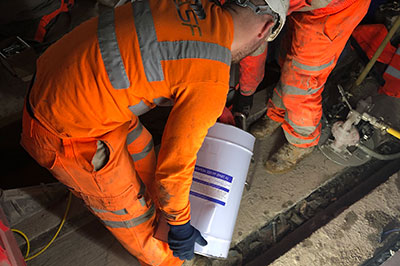
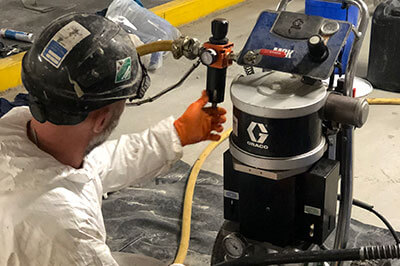
Step 4 – Pumping the Resin
Prior to pumping the prepared resin, the crack first needs to be rinsed with water to remove dust, expose any hidden cracks, and improve the reaction of the resin. Only then can pumping start.
Where you should start the injection depends on the direction of the crack:
- For a vertical crack, start injecting at the lowest point and work upwards
- For a horizontal crack, the injection should begin at the narrowest point
Make sure to remove the valve on the injection pump gun and allow the remaining solvent that was inside the pump (to clean it after its previous use) to pass through until the resin appears.
When setting the pressure that will be used to inject the resin, this can vary from low to high and will depend on the structure itself and the method of injection being used.
Generally speaking, start at the lowest recommended pressure and gradually increase the pressure until the resin begins to flow into the crack. To get an even distribution of material, continue pumping until resin leaks from the adjacent packers. Once this happens, stop pumping and disconnect the pressure line before proceeding to the next packer. Continue with this process until the entire crack is filled.
Once the process is complete and the material is cured, the packers can be removed. We also recommend that the drill holes are sealed with a fast-setting mortar such as PC Patch n’ Plug.
Step 5 – Cleaning the Equipment
The pump equipment should be cleaned and flushed every time there is a stop of more than 15 minutes in the pumping process. For acrylic resins you can simply use water, however, for polyurethane resins, a cleaning solvent such as PC Ecoclean should be used.
You will also need to repeat the cleaning process at the end of the injection process, or whenever necessary. In all instances make sure to continue pumping the cleaning agent through the system until no more resin appears and the clean liquid is coming out of the pump, indicating it is sufficiently clean. Lastly, the metal parts of the pump will also need to be cleaned with an appropriate cleaner.
Find out more information on concrete injection resins and our partnership with TRADECC. To speak to one of our expert Technical team for advice on your waterproofing project, please call 01732 360 095 or email tech@newtonwaterproofing.co.uk.


Expert Installations by our Nationwide Network of Newton Specialist Basement Contractors.

Pass the Waterproofing Design Liability to Newton and our network of contractors
Speak to our friendly, expert team
Our staff are able to provide guidance for projects of all sizes, whether you require some general advice about damp or waterproofing, or support with technical drawings and specifications.


